Thursday, 14 March 2013

How to: dual textured hair

Combining two elements together can either work or fail when done in the fashion sense but a lot more often, the creative minds of designers are able to make opposites seamlessly come together. By doing this, they create something far more beautiful. For the Katie Gallagher fall 2013 New York Fashion Week show, Nick Irwin of Tigi showed his artistry by combining slick and wildly textured in one hairstyle.

The look for the Katie Gallagher show features the combination two hairstyles: first, slicked back hair and the second, a rear bird’s nest. Both styles work well on their own but what Nick Irwin came up with is far more striking and unique. Melbourne hairstylist Annika Bowen showed us the steps on how to get this dual textured look. Read on after the break to get the steps.

dual textured hair

How to: dual textured hair

Start by prepping you hair with Tigi’s Curlesque Styling Mousse to protect your hair and help you style at ease.
After prepping, you need to section your hair. Starting at your nape, take a horizontal section across head. Divide that section into smaller sections by taking vertical partings. You can do 2 or 3 smaller parting sections depending on the width of your head.
Now it’s time to start working on the textured part of the hair. Take one section and spray with Tigi look lock hairspray. Start twisting parting section until it loops back on itself creating a small bun. Fasten with pin curl clip.

dual textured hair how to

Secure and set the curl even more by spraying it with hair spray and then using a flat iron to clamp down the section. Continue doing this with all the other sections until you reach the top of your ears.

dual textured hair how to

Start dragging the sections back to create a build up of twisted sets at back of head in line with the top of your ears. While doing this, make sure all the hair at front hairline is brushed back for that slick look.

dual textured hair how to

Once your hair has cooled down, take the pins out of the twirls and brush them out using your fingers or a cushion brush.
To create the slick wet look in front, use wet look gel at the front hairline. Then take some bobby pins and create a line of criss-crosses from ear to ear across the back of the head. This should create a sort of division between the two textures of your hair.
Go back to the textured part of your hair and tease it with your hands to get your desired look. Keep in mind that it’s really supposed to be messy.

dual textured hair

Lock or set the look by spraying on some more of Tigi’s Look Lock spray.
Finish the look by taking out a small section that reaches the bottom lengths of hair and wrapping it around the bulk of hair leaving about 2 inches loose at bottom creating a half-pony. Secure it with a bobby pin and use hair spray to set the hair.
You can use your fingers again to create more texture on your bird’s nest and then spray on some hair spray to lock it in.

dual textured hair

This hairstyle is a perfect way to spice up any look especially if you want a sophisticated yet modern vibe. If you’re not feeling too adventurous, the two styles combined to create this hairstyle can be worn without each other. Maybe you can start wearing the different textures separately at first and then go dual after that.

Photos courtesy of Tigi.


Source : fashionising[dot]com

Tuesday, 12 March 2013

How to: Prada’s dishevelled noir wet hairstyle

There’s always something about an undone hairstyle that is appealing to a lot of women. The wet look hairstyle is one the biggest 2013 hair trends and taking cue from this was Prada. It was the task of Redken’s creative consultant, Guido Palau, to create a look that would complement Prada’s dark but still effortlessly chic collection.

Prada’s wet look hairstyle was meant to relax the collection which was inspired by film noir and the ’40s. It wasn’t without darkness though, Guido using the words “a little melancholic, and even fragile” to describe the style. The stark difference between the classic and rich pieces and the messy undone hairstyle created a balance in the overall look. It makes the collection feel like it’s not limited to the runway and can be worn by everyday women who are always on the go. This is a very easy hairstyle to recreate and we’ve got the how-to right after the break.

Prada wet look hair

How to: Prada wet look noir hairstyle

Start by prepping wet hair with some volume spray like Redken’s guts 10.
Create the effortless look with a wide tooth comb. Comb your hair and create a messy side part.
Take a good amount of shine oil like Redken’s Diamond Oil Shatterproof shine and apply it into your hair from roots to end. This creates that wet and shiny look.

prada wet hair

On the side opposite your part, clip your hair back behind your ear.
Let your hair air dry for a while and then apply additional shine oil.
Secure your hairstyle with hairspray. For this look Redken’s forceful 23 was used to hold the style and add more shine.
Finish the look off by taking some strands in front of your face and framing it messily to give it more of that undone vibe.

prada wet hair

With Prada utilizing the wet look, it’s safe to say that this is a hairstyle that truly makes a splash. Check out more variations of this hair trend at our wet look hairstyles page.


Source : fashionising[dot]com

Monday, 11 March 2013

Hair how to: elegant, twisted bun

At some point in our lives, we have to attend a formal occasion that requires a more elegant hairstyle. As tempting as it is to show up in a ponytail, a bun is always a better choice for these occasions and this elegant, twisted bun from the Peter Som fall / winter 2013 show is one anyone can easily incorporate in a formal ensemble.

Created by Wella Professional’s Christopher Dove, this look was made to balance out the collection. With pieces that feature high necklines, volume and structure it is only fitting that this 2013 hairstyle is sleek and simple. Annika Bowen, Melbourne Hairstylist and our resident hair correspondent was happy to share with us her steps on how to get this elegant formal hairstyle. Read on after the break for the steps.

Elegant twisted bun

How to: elegant, twisted bun

To help you with styling, prep your hair with Wella Professional’s Velvet Amplifier.
Next, start sectioning your hair. Take a section from ear to ear, across the top of your head.
Take some Mirror Polish Shine Serum by Wella and apply it into both sections of the hair from roots to ends. This gives you that glossy shine.
Take the back section (what’s left after you’ve sectioned the front part of your hair) and brush into a low ponytail.
Next, smooth down fly aways using Wella’s Stay Essential Hairspray.
Now it’s time to create the bun. Take the hair tied in a ponytail and twist it until it wraps back on itself. Make it go around around to create a bun and hold it in place with bobby pins. Spray with hairspray to hold.

twisted bun

Take the front section and create a middle part.
Brush one of the two front sections to side to make it look sleek and twist it away from you face. Twist all the hair back until mid lengths and ends are twisted.
Take the twisted front section back to center of the bun. Wrap it around the bun and pin it in place.
Do the same on the other front side section, making sure both sections are wrapped across the top of the bun to create an X shape.
Finish this hairstyle of by polishing it with some more Wella Mirror Polish and then make it hold with Stay Essentials hairspray.

Hair photos courtesy Wella.

Whether it’s a party or a wedding, this hairstyle is perfect especially if you want to draw attention to your whole look and not just your face. Sleek, modern and elegant, it will surely make you the belle of the ball.

peter som elegant twisted bun


Source : fashionising[dot]com

Saturday, 9 March 2013

5 historical hair how tos: from Cleopatra to Vestal Virgins

Who knew that such a thing as a hairdressing archaeologist existed? Well Janet Stevens recreates historical hairstyles, giving you a history lesson and a hair how-to at the same time. The beauty is that you don’t need to be part of a historical reenactment group to appreciate these styles – and nor do you need to create them with utmost historical accuracy. The next time you don a Grecian inspired dress or Egyptian revivalist jewellery, you can create a suitably classical hairstyle to match – just replace bodkins for bobby pins and modernise the styles in whatever way you see fit.

And many are, in fact, very simple to create. There are countless ways to adapt them into hairstyles suitable for 2013.

After the break, 5 classical hair how-tos from Cleopatra to the Vestal Virgins of Ancient Rome.

Ancient roman hairstyle tutorial

For more visit Janet Stevens’ YouTube channel.


Source : fashionising[dot]com

Thursday, 7 March 2013

Hairspiration from the Clandestine Collection

It’s not often that a campaign for hair colour catches our eye, but Revlon’s new Clandestine collection is so ripe with inspiration for 2013′s hair trends that we couldn’t let it pass us by.

Knowing that bobbed hairstyles have been making an impact yet again this year, the campaign focuses on icons of the 1920s. Even more striking is the use of bangs in these sharp and richly coloured hairstyles. For everyone? Of course not, but Revlon’s campaign is about making a statement, and if a statement is what you want then it’s well worth a look.

Clandestine collection Revlon

Click the thumbnails for full pictures:
Revlon Professional Clandestine Collection

To view more shots from the campaign, head to the gallery.


Source : fashionising[dot]com

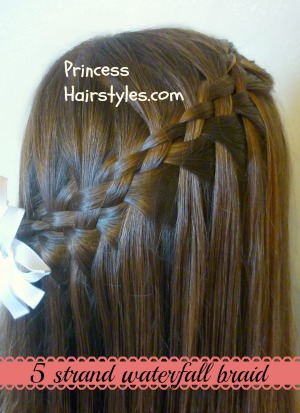
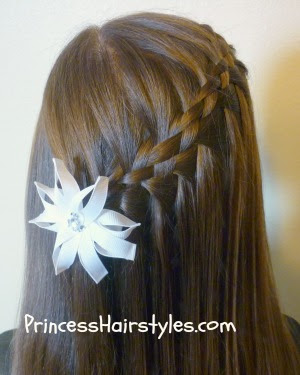
5 Strand Waterfall Braid

How To Five Strand Waterfall Braid Tutorial

5 strand waterfall braid video tutorial

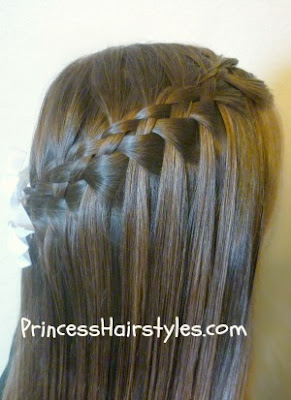
A beautiful and intricate waterfall braid using 5 strands of hair instead of the standard 3 strands! This technique creates a unique woven effect where the braid lies, along with the familiar cascading strands hanging below (a look which has made the fall through braids such popular hairstyles.) 

Five strand watefrall braid video tutorial

We have done several "non standard" waterfall braid tutorials on our hairstyling site recently, including a fishtail braid, a twist braid, and now a 5 strand braid. Feel free to check out the other two variations if you haven't already! 

Unique waterfall braid

This plait is actually quite advanced and can be difficult to master at first.  It's probably one of  the more difficult braids we have posted here on our hair blog. But, I don't want to discourage you.  It's just so beautiful, I believe it's worth the effort.  ;)  Like most braids (and other non hair related things in life) after a little practice... it's really not so bad!


5 Strand Waterfall Braid Video Tutorial:


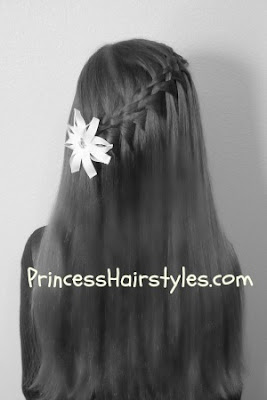
Half of this next picture turned out blurry.. and I'm not sure why.  Darn!  I tried to fix it, even trying black and white, but  was unsuccessful.  Anyway, she is so excited to have such long hair again.  She has been hoping to be able to grow her hair out to her waist.  Almost there!

5 strand fall through braid, long hair
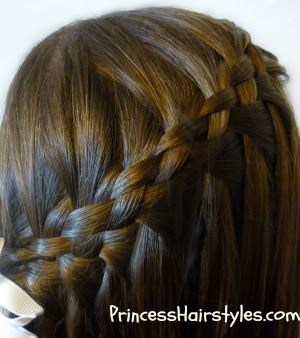
And.. a close up of the braid.
woven waterfall braid

Hope you enjoyed. We would love to see pictures of this one on our facebook page if you try it. And as always, feel free to pin and share!


Source : princesshairstyles[dot]com
Wednesday, 6 March 2013

How to recreate a day-old blowout: the hair at Ungaro

A day-old blowdry has its own kind of charm. More effortless and lived in than it’s bouncy first-day counterpart, it’s a kind of surprise twist of the hair universe: somehow, hair that you’ve slept on can be just as good or even better than when it was freshly done.

To balance out the bold ’80s silhouettes of Emanuel Ungaro’s fall 2013 collection, Redken’s Guido Palau set about recreating that day-old blowout look. The end result was richness without volume, movement without bounce; the effect of hair that had volume that has settled. If hair has a memory (and according to Guido, it does) then creating this look is like creating the echo of a blowout without having to wait a day.

This is effortless looking hair that takes effort, but – as Guido points out – it’s the small things that make a different. Go through this process if you want hair that’s rich and luxurious but “not too silky-smooth.” As he explains, “it’s not grungy, but I still wanted it to feel light and easy and not too perfect. It’s glamorous and very 80′s; a rich girl’s hair.”

Day old blowout hairstyle

How to: Ungaro’s day old blowout

On damp hair, apply Redken’s Satinwear 02 ultimate blowdry lotion liberally and work it through. Backstage at Emanuel Ungaro, this was the key product used to create the look.

redken satinwear

Create a natural but not too messy center part in the hair.
Blow dry the hair section by section with a round brush.

blow dry hair

After each section has been dried, wind it into a curl and pin it to the head. When done, you should have a full head of pin curls.

day old blow dry

Leave the curls to set for as much time as you have (it might be 30 minutes to an hour) before taking them out and brushing through the hair.
Finally, repeat blow drying the hair over again. It will keep the memory of the first blow dry and pin curl setting, but brushing it out and re-drying it will take away the wave and volume on top leaving just a glamorous, rich but subtle hairstyle.

day old blowout

Note that backstage the double blow-drying process was used; but if you’re short on time you can still get a smooth and gorgeous hair look by simply following steps 1-3.

For more 2013 hairstyle ideas and tutorials, follow that link.


Source : fashionising[dot]com